Posts

XO Post Upgrade

When you run olpc-update to upgrade the software on your XO laptop, you lose some of your customizations (which I just did ). Here's what I've customized so I have a quick reference to get it all back next time. Set the timezone : su sugar-control-panel -s timezone 'America/Los_Angeles' Set a root password: su -l passwd This allows me to ssh to the XO (as root, I know, I know) which at least allows me to use my nice desktop keyboard and monitor to do most of the rest. I tried setting the user account password instead once, but it seems like Sugar wouldn't start after that. This page seems to indicate that you should be able to do that (now?) though. I'll have to try it again. Set up quake terminal (scroll down the page a bit). I keep a copy of the quake_terminal.txt file in my home directory on the laptop. To set it up I just do this: su -l cp /home/olpc/quake_terminal.py /usr/share/sugar/shell/view/quake.py Then apply this patch to /usr...
Upgrade XO to Build 703

I upgraded my XO to Build 703 this week. It was a little difficult at first, but I like it now. It's so cool that it now suspends when you close the lid. This is the first Linux laptop that I've had that does that so smoothly. Disk space is at a premium on this little machine. I actually couldn't get Sugar to start after the upgrade until I did a ctrl-alt-f1 over to a virtual console and removed some files from my home directory. One utility that is nice for adding and, maybe more importantly, removing Activities is xo-get.py . Once installed you can just ./xo-get.py remove ActivityName to free up more disk space. Nice. Removing activities wasn't nearly enough though. I was still really full on disk space and after poking around with du I found the /versions directory that seems to contain the complete set of files for the previous version of the OLPC software (after an update you can boot the previous version by holding down tho 'o' gamepad key...

You Really Should Hack Linux

I have a confession to make. I'm an avowed Linux geek, yet I haven't complied the kernel in years. The last time was probably in school when I had to write my own scheduler for the kernel as an assignment, which isn't all that bad when you consider that most people compiling their own kernels are just enabling some obscure driver that they needed. They haven't made Major Modifications to a core piece like The Scheduler. Right? Right? Well, OK, the scheduler wasn't anything to write home about, but it still felt pretty l33t. Anyway, I've decided it's time I delve into the source of Linux again. It's one of the most successful large software projects on the planet, and it's completely open for anyone to dig into. It would be a horribly wasted opportunity for a serious software engineer to miss out on, especially someone interested in nitty-gritty low-level stuff. Even if you aren't interested in OS code or drivers at all, you could study...

WAF Build System

I just took WAF for a very brief test drive after seeing ESR mention it on emacs-devel (trying to find an answer to a completely different emacs related issue). I really like how easy it is to install and try out a demo with it, and the manual isn't bad. I like the colored output and ascii-art progress bars. Nice touches. It's all Python, which is both good and bad. The syntax isn't super intuitive (compared to basic make where you pretty much just list files and commands), being all python functions that set up and and get called by internals of the tool itself, but I guess once you get the hang of it that wouldn't be too bad. It also does more than just build. It handles detection of compilation tools, dependency tracking (yes it understands C/C++ preprocessing), and also does languages other than C/C++. If I had a new project I'd definitely give it a try.

Ubuntu Hardy - Worse Photo Import Than Before

Image
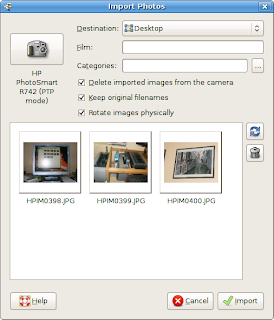
I like f-spot a lot, but it has a few things that really bug me. I guess I should stop complaining and get involved , but then I'd have to learn C#. I don't know if I can bring myself to do that ;-) Anyway, here is what I used to see when I connected my digital camera to my Ubuntu 7.10 machine: Now that I have Ubuntu 8.04, when I plug in my camera I first see this: Yes, that's two confusing choices for one camera. Choosing either gets the same results: Yup, it's offering to download some xml files and some other non-image files, and more room is devoted to showing you the full path to the files (that you really don't care about) than to showing you the actual thumbnail image. The option to delete from the camera what you just downloaded is gone too. Oh, and no videos will actually show up in F-spot, the program that is now doing this importing. Was anyone who uses a digital camera consulted on this move? I'm not alone in not liking this chan...

"could not stat the resume device file"

We have a local mirror of the Ubuntu repos here at work and they are pretty fast. I couldn't figure out how to get update-manager to use them, so I upgraded my desktop machine to Hardy Heron by changing everything in /etc/apt/sources.list from gutsy to hardy and typed sudo aptitude update && sudo aptitude full-upgrade and let it run. It asked a couple questions about modified config files and such which I answered, and then it was done. I rebooted and it put up the pretty "UBUNTU" with the new pulsating KITT -esque progress bar...and it never went beyond that. I finally hit alt-f1 and saw that it was waiting for my input with the prompt: resume: could not stat resume device file /dev/sda10. Please type in the name to try again or press ENTER to boot the system I hit enter and it seemed to boot just fine. This is a pretty annoying thing to have to do every time you boot, so I searched until I found the solution for me: reinstall initramfs-tools , like so...

KVM in Ubuntu Hardy Heron

Apparently there are some new gui apps for running and interacting with KVM on Ubuntu 8.04. After reading those two blog entries, I fired up virt-manager and virt-install, and wasn't very impressed. I didn't like the idea of piping the graphics through VNC when all I want is to run a virtual machine on my local desktop. And why do you need a confusing GUI when the command-line utilities for kvm/qemu are so straightforward? Now that I've said that, I'll point you at this overly complex KVM guide just so you can follow the first part to check if your CPU supports hardware virtualization . I would pretty much ignore the rest of that guide. Oh, and if your CPU doesn't support hardware virtualization, you can pretty much replace kvm with qemu in all the below steps and this will still work, just slower. Allright, here's how I set up a new KVM instance on my Ubuntu Hardy Heron box. I installed Hardy on the virtual machine in this example, but you could ju...